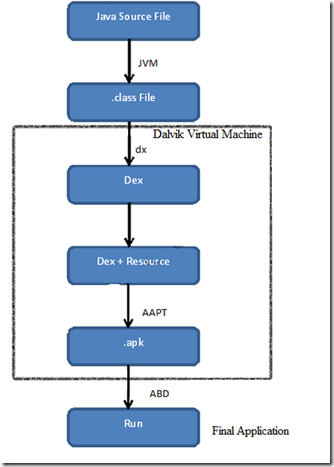
The Android system software stack is typically divided into the four areas as the following graphic:

Terminology
1. Android
Software Development Kit (Android SDK) contains the necessary
tools to create, compile and package Android applications
2. Android
debug bridge (adb), which is a tool that allows you to connect to a virtual or
real Android device
3. Google
provides two integrated development environments (IDEs) to
develop new applications.
4. Android
Developer Tools (ADT) are based on the Eclipse
IDE
5. Android
Studio based on the IntelliJ IDE
6. Android
RunTime (ART) uses Ahead Of Time compilation, and optional runtime for
Android 4.4
7. Android
Virtual Device (AVD) - The Android SDK contains an Android device emulator.
This emulator can be used to run an Android Virtual Device (AVD), which
emulates a real Android phone
8. Dalvik
Virtual Machine (Dalvik)-
9. The
Android system uses a special virtual machine, Dalvik, to run Java-based
applications. Dalvik uses a custom bytecode format which is different from Java
bytecode.
10.Therefore
you cannot run Java class files on Android directly; they need to be
converted into the Dalvik bytecode format.
This
post will be for beginners on Android applications, and will teach you fast
mobile application development from Android Developer Tools (ADT) based on the
Eclipse IDE.
1.
Start ADT and then go file—> new –> Android Applications Project
2.
Follow the wizard with give project name (other values can be defaults as it
is)
3. You
will get below project structure
4. As
below UI, you can drag and drop text-edit and button
In this
sample we will added button action to pick text in text-field that mobile user
entering to to above text label to show.
5.
Go to text mode of above UI (res/layout/fragment_main.xml) and added below line
to button, to pick action when button is click
android:onClick="sendMessage"
6. Then
write a function in MainActivity.java in 'src'
** Called when the user touches the button
*/
publicvoid
sendMessage(View view) {
// Do something
in response to button click
}
7. No
we will write code to read string on text-field and added to text label
/** Called when the user touches the button */
publicvoid sendMessage(View view) {
// Do something in
response to button click
EditText editText =
(EditText) findViewById(R.id.editText1);
TextView textView =
(TextView) findViewById(R.id.textView1);
//getting string from
edit text field
String name =
editText.getText().toString();
//adding string to text
view / text label
textView.setText(name);
}
8. Now
run application in phone and see is it working as we expected. You can use a
hardware device to run it for tests also, and this post shows how: ‘‘Using Hardware
Devices to Run Android App from IDE.’
Log
message also to know, simple. You can add a log as below to your java method
Log.v("EditText",
editText.getText().toString());
[NOTE]
- tag:
Used to identify the source of a log message. It usually identifies the
class or activity where the log call occurs
- msg:
The message you would like logged
Log
filtering can be done by
- ASSERT
- The println method.
- DEBUG
- The println method; use Log.d.
- ERROR
- The println method; use Log.e.
- INFO
- The println method; use Log.i.
- VERBOSE
- The println method; use Log.v.
- WARN
- The println method; use Log.w.
look
console log from PC